Home Automation Adventures
Welcome to my Home Automation Adventures. If you are like me, new and interested in Human-Machine Interaction (HMI) follow me on my journey as a novice in this topic struggling through this vast wealth of information and learn what works for me.
My goals are to integrate devices such as a heat pump, lights, and smart plugs in a family- and spouse-approved manner into a new-build house and have it controlled with an aesthetically pleasing dashboard.
Hardware
| Testing Environment | Production Environment |
|---|---|
| Raspberry Pi 3 with 16GB SanDisk SD-Card | Virtual Machine in a 3 Node Proxmox Cluster |
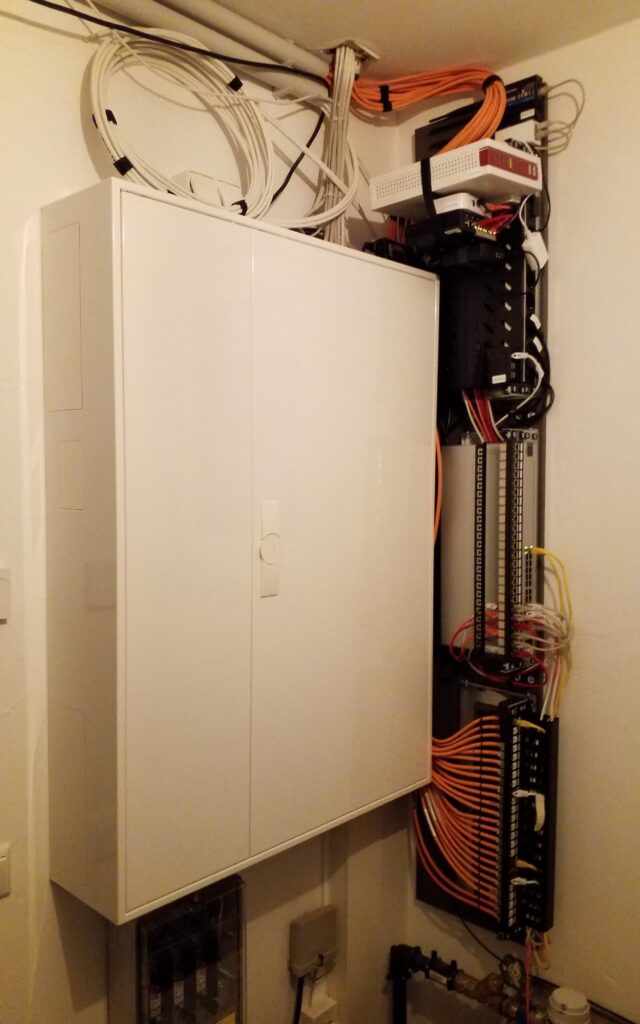
- Mounting
- Laminated wood board – IKEA cupboard door FORSAND (50x229cm) (leftovers from the kitchen)
- Z-Holders – Hangman Z-12-2 Robuste Z-Wandhalterung
- 19″ Wall Mount – Stalflex
- Screws – DIGITUS DN-19-SET-S
- 19″ Shelf – DIGITUS DN-19 TRAY-1-SW
- Power Distribution Unit (PDU) – DIGITUS DN-95407
- Patchpanel 24 Port – DIGITUS DN-91411
- Keystone Moduls CAT 6 – DIGITUS DN-93615
- Pin assignments – TIA-568B
- Cable Management – DIGITUS DN-97617
- Cable clamp – DIGITUS DN-19 ORG-2-SW
- Velcro tape – DIGITUS DN-CT-10M-20
- Heat shrink tubing – ISOLATECH 15mm / 18mm
- Patch cabel
- Inhouse – Draka UC900 HS23
- Wall mount
- Keystone Plate – Busch Jaeger 0219/14
- Frame – Busch Jaeger 1721-914
- Insert – Busch Jaeger – 2539-914
- Tools
- Label maker – Niimbot D110
- Cable finder – HANMATEK SF2
- Cable tester – NOYAFA NF-8209S
- Crimpset – SGILE 12 in 1
- Flush cutters – VCELINK GJ706BL
- Long nose pliers – KNIPEX 2502140
- Internet
- WAN 1 – AVM FritzBox Cable 6690
- WAN 2 – Teltonika RUT 240
- Router – pfSense
- Network switch- UniFi Standard 24 PoE
- * The Controller runs in a self-hosted VM
- Access Points – 2x UniFi AC Pro
- * The Controller runs in a self-hosted VM
- Boiler / Heat pump Integration – BBQKees Electronics
- Electric power meter reader – stromleser.tasmota
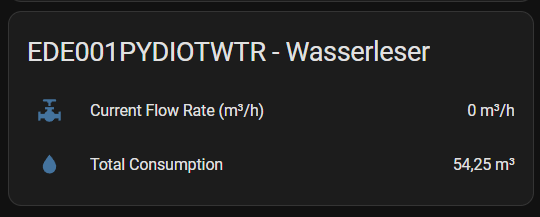
- Water meter reader – wasserleser
- Zigbee
- Controller
- Sonoff Zigbee 3.0 USB Dongle Plus V2 (Production)
- Sonoff Zigbee 3.0 USB Dongle Plus (Testing)
- Controller
Software

- Virtualisation
- Guest OS
- Directory Service
- Monitoring
- Web hosting
- WiFi Controller
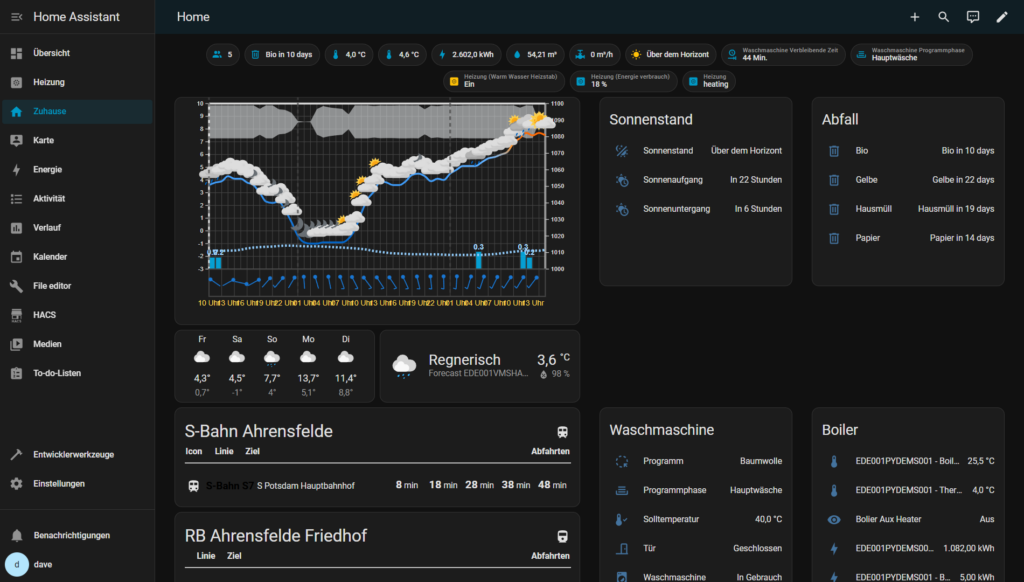
Home Assistant
Home Assistant
https://www.home-assistant.io/
- Core tools
- The Home Assistant Community Store (HACS)
https://www.hacs.xyz/
- MQ Telemetry Transport (MQTT) with Mosquitto Broke
https://www.home-assistant.io/integrations/mqtt/
- Configuration.yaml File editor
https://www.home-assistant.io/docs/configuration/
- Home Assistant – Integrations in production
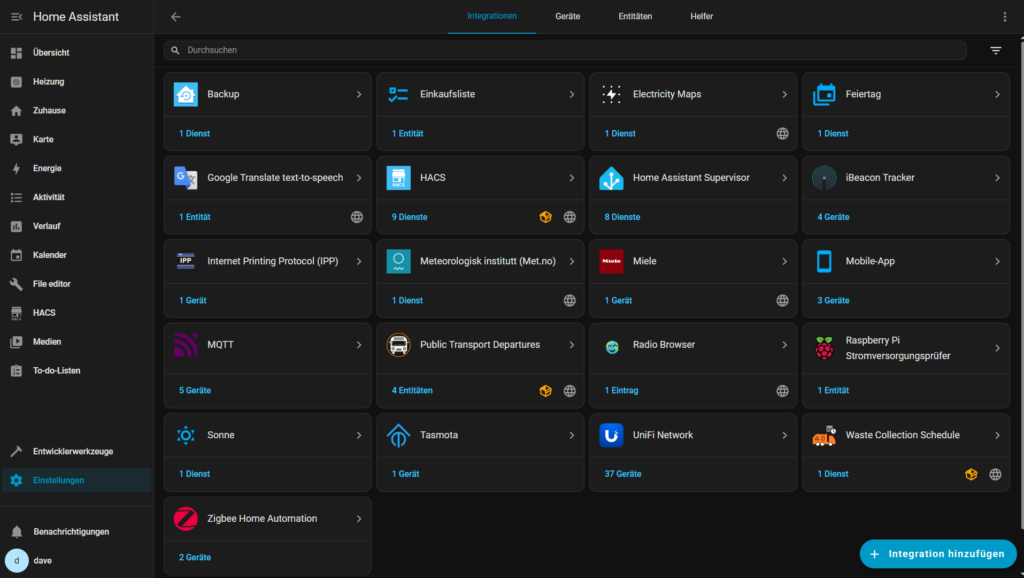
- Meteorologisk institutt (Met.no)
https://www.home-assistant.io/integrations/met/
- Music Assistant
https://www.music-assistant.io/
- Power Flow Card Plus
https://github.com/flixlix/power-flow-card-plus
- Public Transport Departures
https://community.home-assistant.io/t/public-transport-departures-integration/902401
- UniFi Network
https://www.home-assistant.io/integrations/UniFi
- Waste Collection Schedule
https://github.com/mampfes/hacs_waste_collection_schedule
- Zigbee Home Automation
https://www.home-assistant.io/integrations/zha/
Testing
- Advanced Camera Card
https://github.com/dermotduffy/advanced-camera-card
- Home Assistant – Add ons
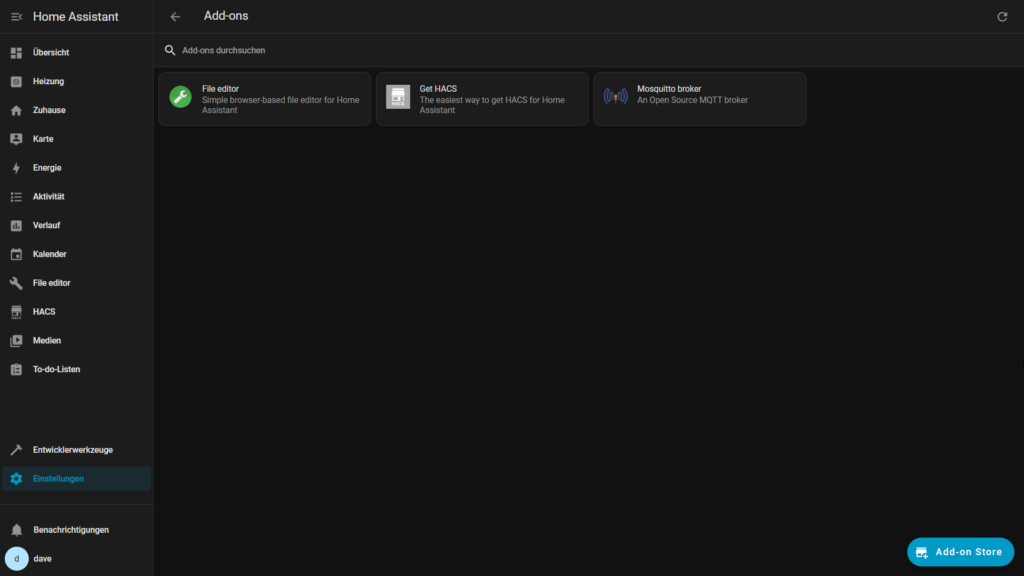
- Configuration.yaml File editor
https://www.home-assistant.io/docs/configuration/
- The Home Assistant Community Store (HACS)
https://www.hacs.xyz/
- MQ Telemetry Transport (MQTT) with Mosquitto Broke
https://www.home-assistant.io/integrations/mqtt/
Devices
Sensors
- Heat pump
- Bosch Compress 5800i AW
https://www.bosch-homecomfort.com/de/de/ocs/wohngebaeude/compress-5800i-aw-19312694-p/
- Bosch Compress 5800i AW
- Boiler / Heatpump Integration
- BBQKees Electronics
https://bbqkees-electronics.nl/
- BBQKees Electronics
- Electric power meter reader
- stromleser.tasmota
https://stromleser.de/
- stromleser.tasmota
- Water meter reader
- wasserleser
https://stromleser.de/pages/wasserleser
- wasserleser
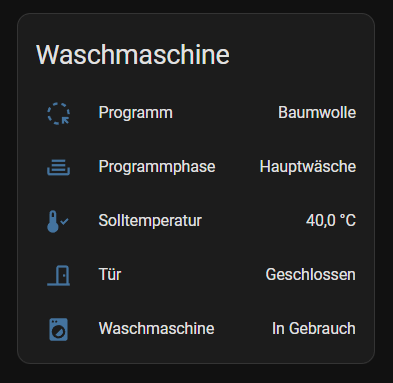
- Washing Machine
- Miele W1 (SmartStart/SmartGrid-Funktion)
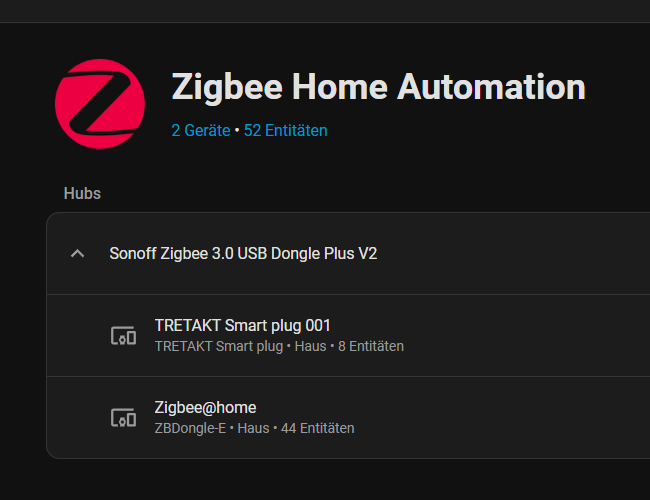
- Zigbee
- Controller
- Sonoff Zigbee 3.0 USB Dongle Plus V2 (Production)
- Sonoff Zigbee 3.0 USB Dongle Plus (Testing)
- Controller
- Lights
- IKEA TRADFRI LED Starter-Set (7,3W)
- IKEA TRADFRI Driver (30W)
- IKEA ÖVERSIDAN LED light bar (4,6W)
- Sensors
- Sonoff SNZB-02D (Temperature/Humidity Sensor)
- Smart plugs
- IKEA TRETAKT
- Matter und Thread (Testing)
- Controller
- Home Assistant Connect ZBT-2
https://www.home-assistant.io/connect/zbt-2/
- Home Assistant Connect ZBT-2
- Controller
- Lights
- IKEA KAJPLATS LED E27 470lm
- IKEA KAJPLATS LED E27 1055lm
- IKEA KAJPLATS LED E27 1521lm
- Sensors
- MYGGSPRAY – Wireless motion sensor
- Klippbok – Water leakage sensor
- Under consideration
- Air Quality Monitor
- Airgradient
https://www.airgradient.com
- Airgradient
- ePaper Display
- TRMNL
https://trmnl.com
- TRMNL
- Smartspeaker
- Satellite1
https://futureproofhomes.net
- Satellite1
- Air Quality Monitor
Knowledge Base
- Bosch Smart Home Community
https://community.bosch-smarthome.com/t5/funktionen-und-nutzung/w%C3%A4rmepumpe-compress-6800i-aw/td-p/50081
- Optimierung WP-Einstellungen Buderus WLW186i
https://www.haustechnikdialog.de/Forum/t/270919/Optimierung-WP-Einstellungen-Buderus-WLW186i
- Bosch/Buderus Wärmepumpen
https://bosch-buderus-wp.github.io/
- BBQKees Electronics Wiki
https://bbqkees-electronics.nl/wiki/
- EMS-ESP Firmware
https://emsesp.org/
- Michael Theusners Wetter- und Klimaseite
https://www.mtwetter.de/
- VNBdigital – Das Netzportal Ihrer Verteilnetzbetreiber
Das Netzportal Ihrer Verteilnetzbetreiber
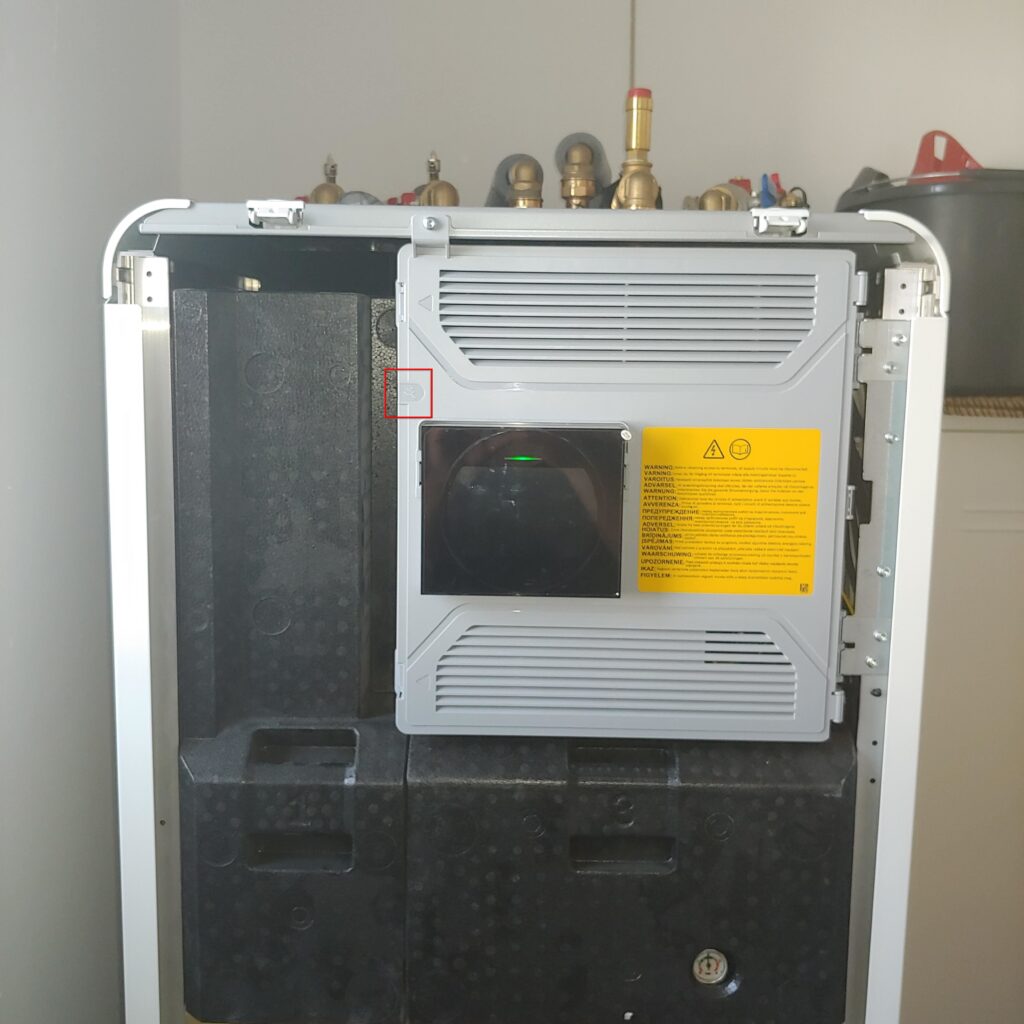
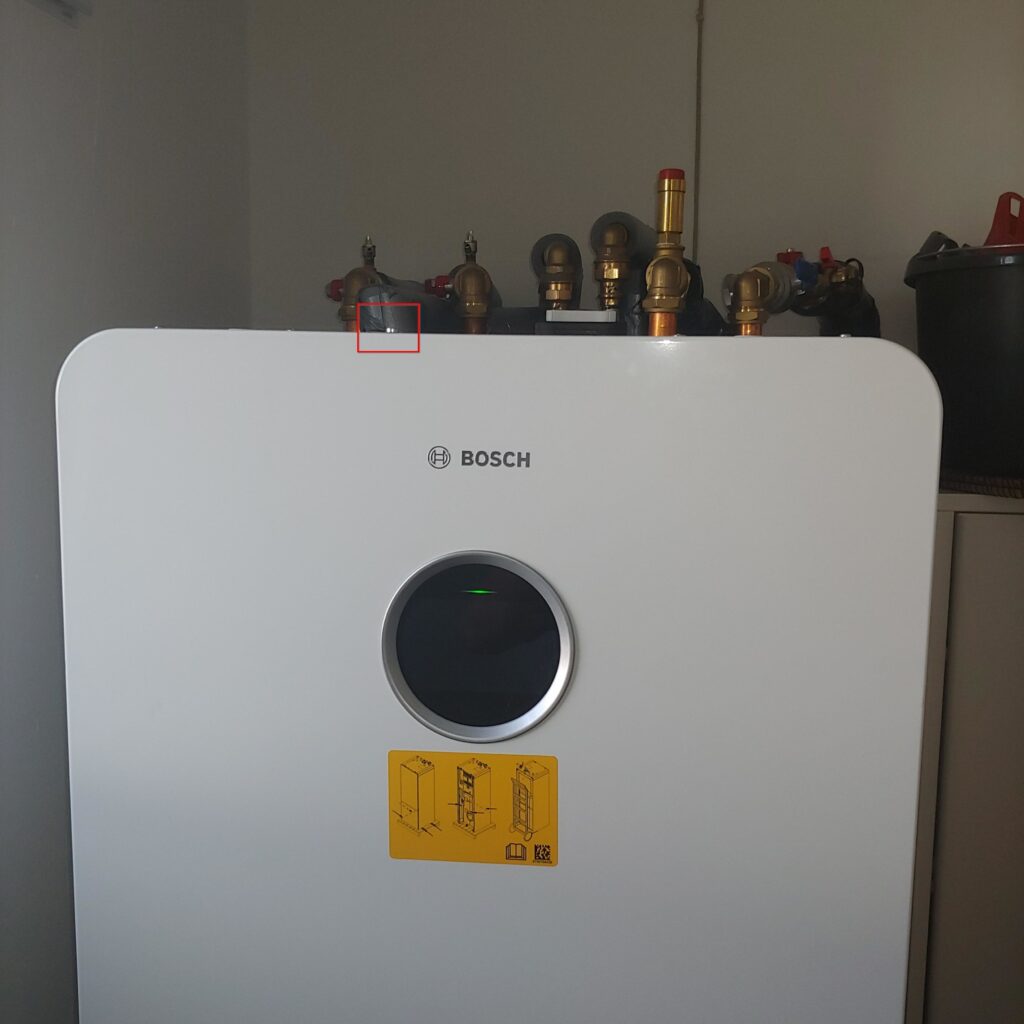
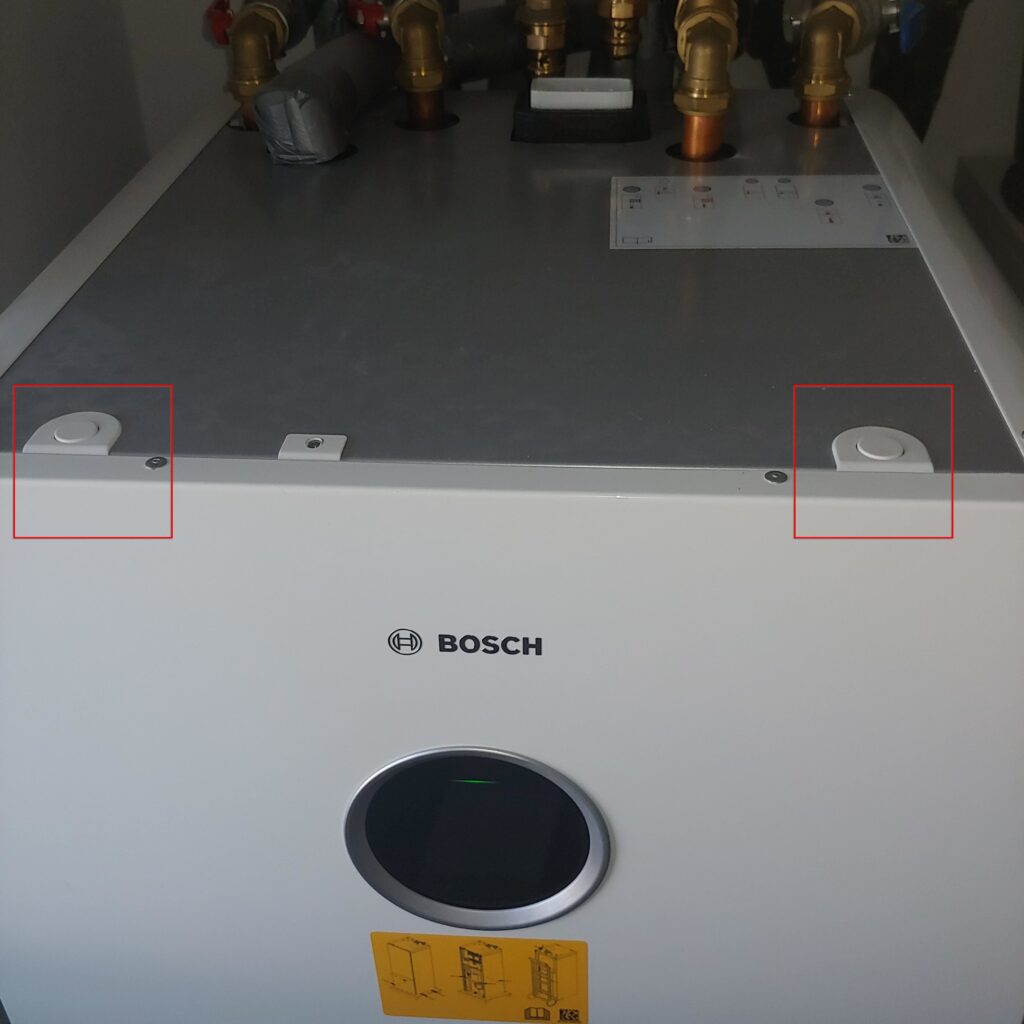
How to integrate the BBQKees Electronics Gateway E32 V2
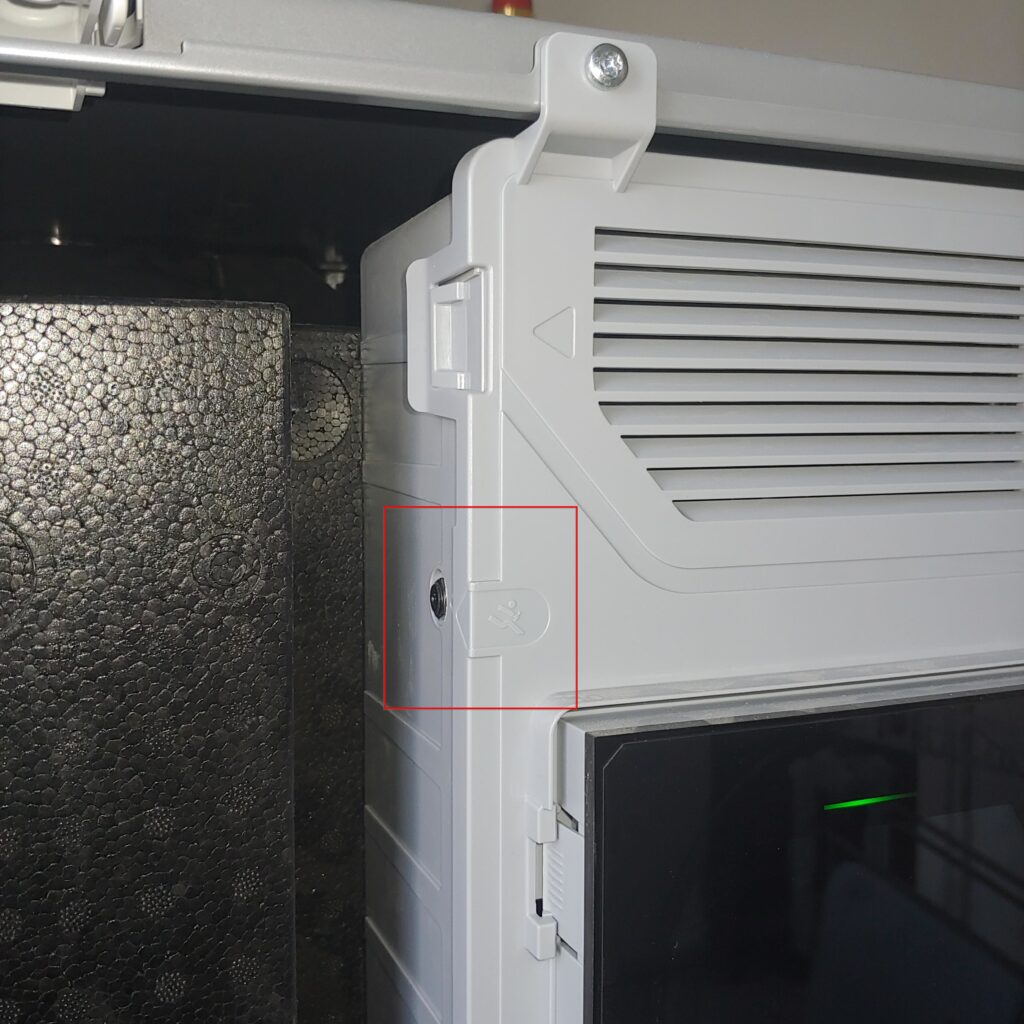
Start by removing the front cover by loosening the top screw, pushing in the two tabs, and lifting off the cover.
How to setup the BBQKees Electronics Gateway E32 V2
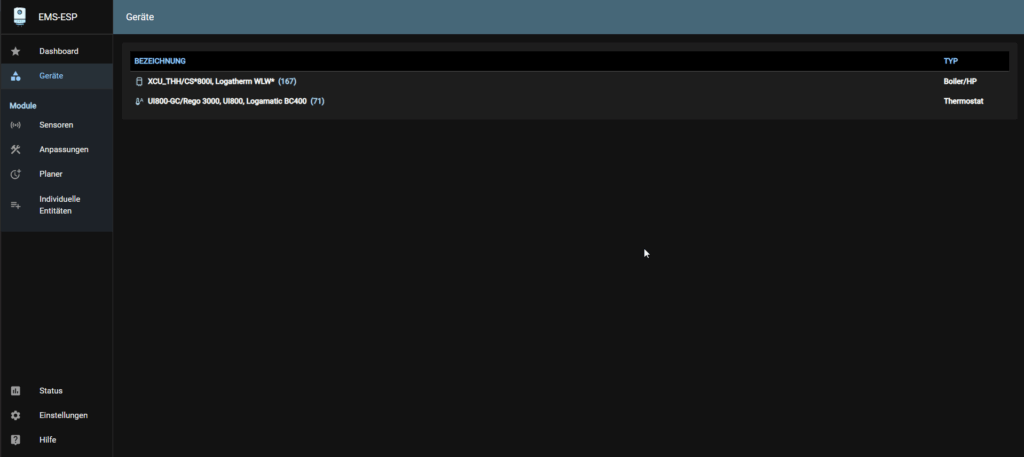
- Use this guied to setup the BBQKees Electronics Gateway E32 V2
https://bbqkees-electronics.nl/wp-content/uploads/documents/manuals/Bedienungsanleitung-EMS-Gateways.pdf- Example of the discovered devices
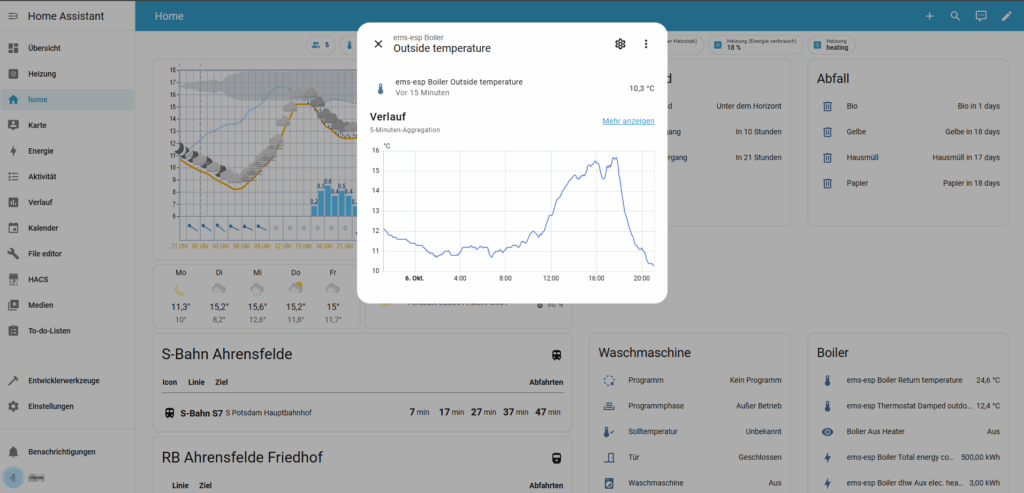
How to intergrate the BBQKees Electronics Gateway E32 V2 into HMI (Home Assistent)
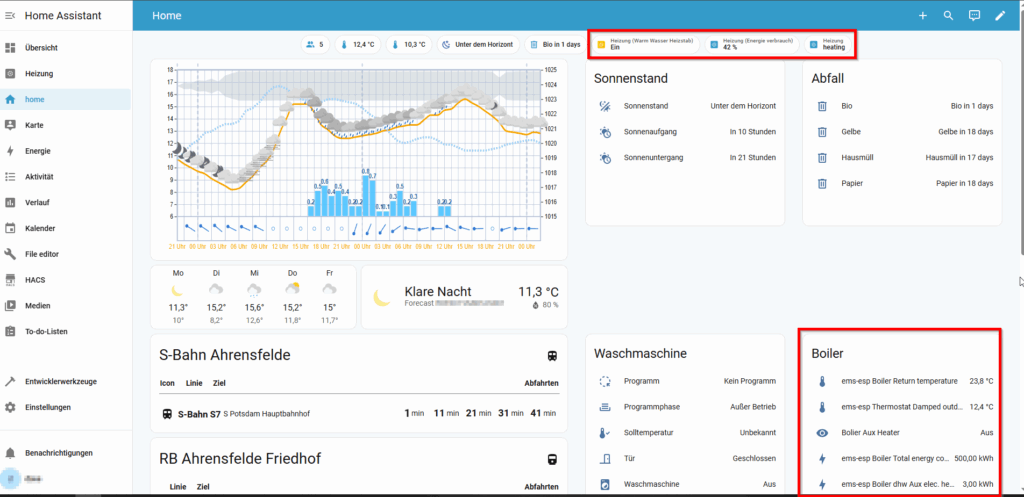
- How to setup Home Assistent
https://bbqkees-electronics.nl/wiki/home-automations/home-assistant-configuration.html
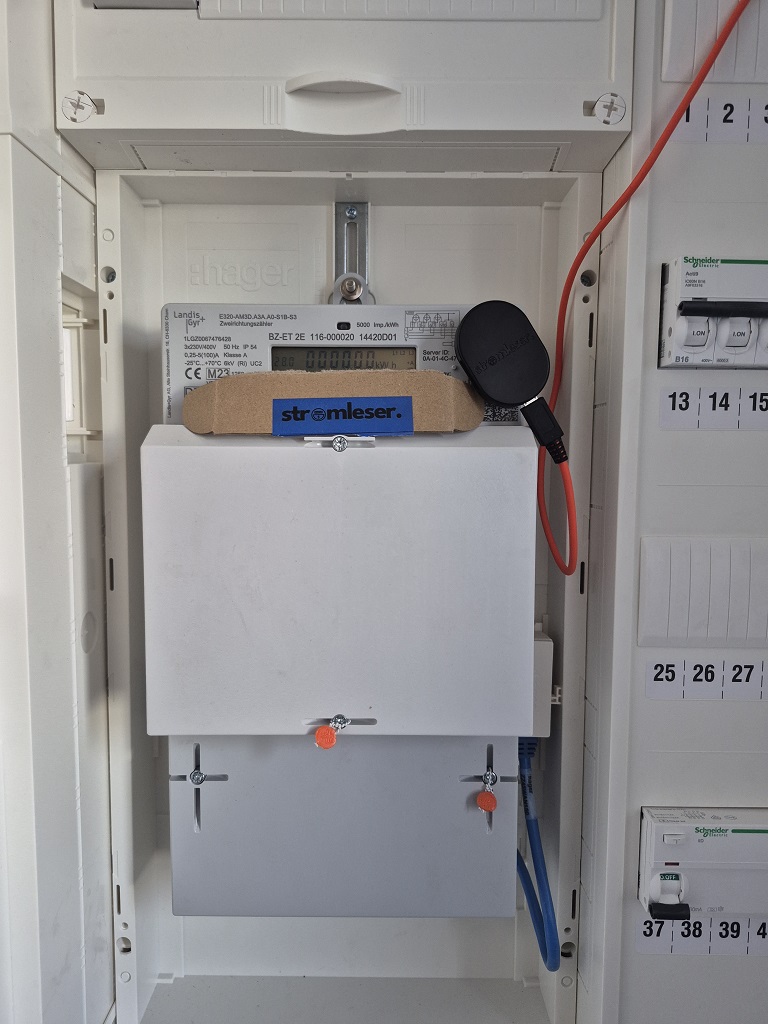
How to integrate the stromleser
How to integrate the stromleser.tasmota
Helpful links
- Stromzähler smart machen: Stromleser Lesekopf mit Home Assistant nutzen
https://www.youtube.com/watch?v=DFv9XQXFyI8&t=1s
Start by connecting the stromleser.tasmota to the IR Interface of the Smartmeter and provide it with power.
After booting, the device creates its own WiFi Hotspot.
You can connect to the default WebGUI by joining the WiFi Hotspot and opening http://192.168.4.1 in your Web Browser.
Configure the device to your preferences
(IP-Address, etc.)
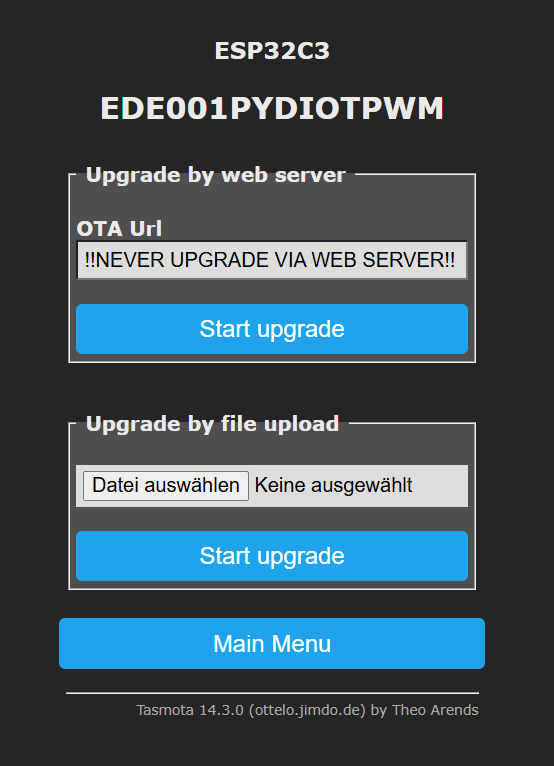
IMPORTANT: DO NOT UPGRADE THE FIRMWARE VIA THE WEB SERVER !
You need to use a customized version and manually upload it to the device.
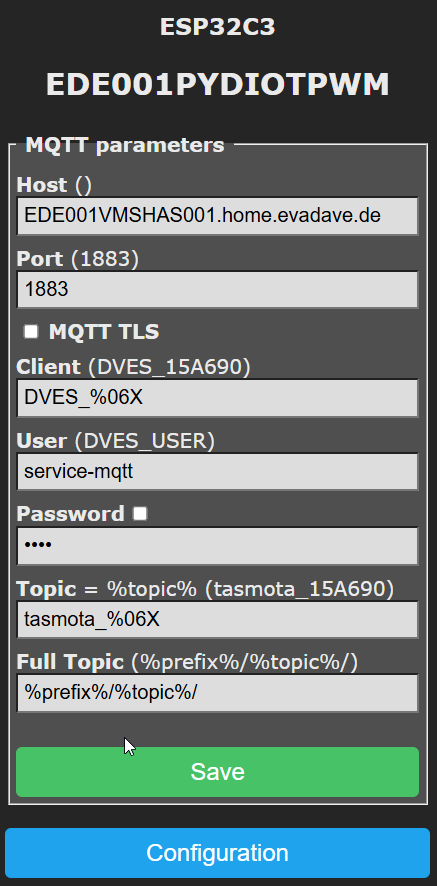
Configure the MQTT settings
For Tasmota to read the values, you need to add the correct script for the Smartmeter you are using.
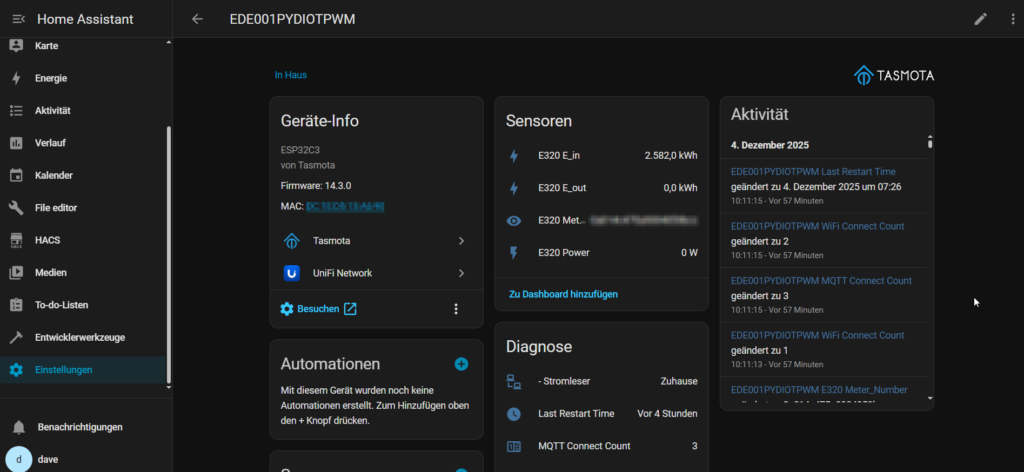
After adding the code, the values will be displayed.
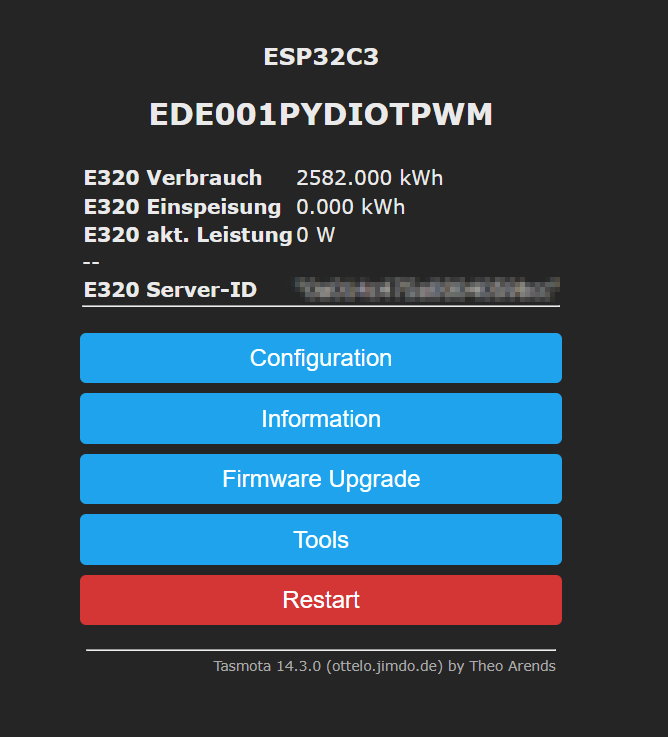
e.g. Landis + Gyr E320
>D
>B
=>sensor53 r
>M 1
+1,3,s,16,9600,E320,1
1,77070100010800ff@1000,Verbrauch,kWh,E_in,3
1,77070100020800ff@1000,Einspeisung,kWh,E_out,3
1,77070100100700ff@1,akt. Leistung,W,Power,0
1,=h--
1,77070100600100ff@#,Server-ID,,Meter_Number,0
#
To get all available values you need to unlock the Smartmeter otherwise it will only provide total consumption.
- Request the PIN from e.dis
Phone: +49 3361 739 61 00
After entering the PIN into the Smartmeter you need to
- set the option “INFO PIN” to off (light on for 5 sec)
- set the option “INFO inf” to on (light on for 5 sec)
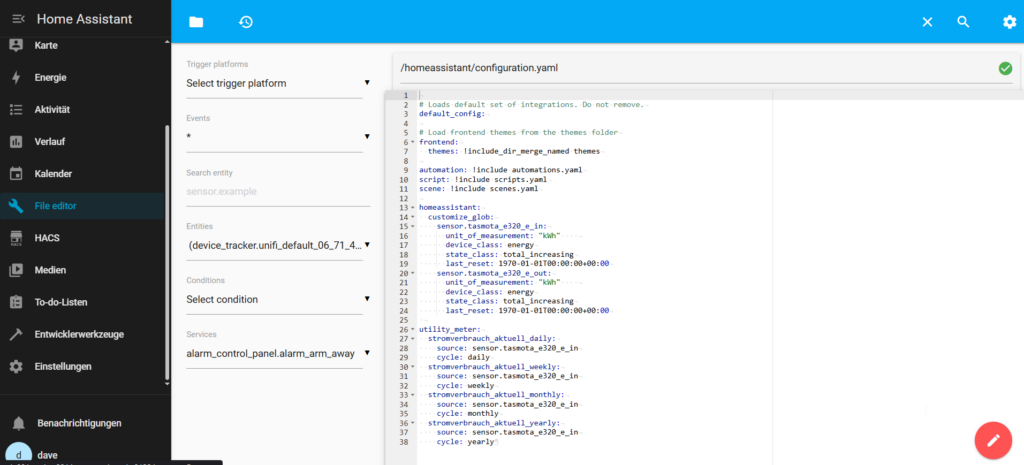
To display the correct unit of measurement in Home Assistant, you need to customize the sensor.
Add the below code (for Landis + Gyr E320) to the “configuration.yaml” file to set the unit of measurement (kWh).
homeassistant:
customize_glob:
sensor.tasmota_e320_e_in:
unit_of_measurement: "kWh"
device_class: energy
state_class: total_increasing
last_reset: 1970-01-01T00:00:00+00:00
sensor.tasmota_e320_e_out:
unit_of_measurement: "kWh"
device_class: energy
state_class: total_increasing
last_reset: 1970-01-01T00:00:00+00:00
utility_meter:
stromverbrauch_aktuell_daily:
source: sensor.tasmota_e320_e_in
cycle: daily
stromverbrauch_aktuell_weekly:
source: sensor.tasmota_e320_e_in
cycle: weekly
stromverbrauch_aktuell_monthly:
source: sensor.tasmota_e320_e_in
cycle: monthly
stromverbrauch_aktuell_yearly:
source: sensor.tasmota_e320_e_in
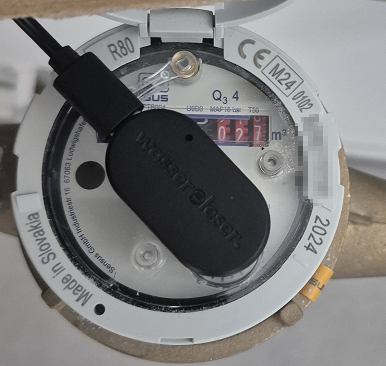
cycle: yearlyHow to integrate the wasserleser
How to integrate the wasserleser
Helpful links